How to Clean Vinyl Records with Household Products

There is great debate among music enthusiasts about which playback technology produces the best listening experience—be it vinyl, CD, or high fidelity downloads. But what some may not know is that there is also another debate pertaining to how best we can clean our vinyl records if and when they get dirty.
Some feel that even though record cleaning machines are expensive, the superior cleaning results are worth the cost. I actually made a video on this (which you can watch below), where I showed you how to use the Okki Nokki record cleaning machine and gave my thoughts on whether it was worth the money:
Still, there’s others that believe that a sufficient cleaning job can be done manually using the many commercially available products.
However, this article will go down another path by helping you best determine the ways you can efficiently clean your vinyl records by using everyday items located in your household.
In fact, by combining cheap ingredients we all already have in our homes, we can achieve a high enough percentage of the perfect cleaning solution get our records looking and sounding great.
And for comparison sake, please take a brief moment to view some of the professional vinyl record cleaners on the market, and see how they stack up to some of the household cleaning methods we will discuss throughout today’s article.
| Photo | Model |
|---|---|
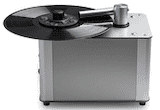 | Pro-Ject VC-E 2 |
 | HumminGuru |
 | Spin Clean Kit |
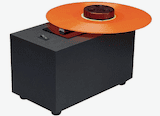 | Record Doctor |
 | Pro-Ject VC-S3 |
Why You Should Clean Your Records
There is no debate that you should clean your vinyl. The music streaming, MP3-playing, iTunes-browsing, digital-listening crowd out there knows it, and it’s a reason they often prefer their newer-aged technology over vinyl.
It’s just less high maintenance. But if you’re willing to put in a little bit of work to maintain your records, you’ll be rewarded with records that not only sound great, don’t skip when they’re being played.
| Best Selling Turntables |
|---|
| 1) Audio-Technica AT-LP70XBT |
| 2) 1 By One Turntable |
| 3) Audio-Technica AT-LP120XUSB |
The Truth About Records Grooves and Dust
Now the groove in your vinyl record is like the Grand Canyon, only microscopic. The phonograph stylus travels along the groove like the Colorado River follows the canyon.
The canyon is interesting because of the varied landscape. The walls are uneven and bumpy, sometimes steeper in places, sometimes curvier.
The walls of a record groove are not smooth, either. Music on vinyl records is encoded in the bumps and ridges. They make interesting music as the stylus travels by, causing it to vibrate to the pitch and tone of what was recorded.
A randomly shaped piece of dust or other foreign material that gets between the needle and the decidedly non-random bumps in the groove will cause the needle to vibrate randomly. . . not the way to recreate music.
Changing the shape of those well-placed bumps will alter the sound as well. The Colorado River has eroded away the wall and floor of the Grand Canyon, changing its depth and shape. As your record stylus contacts the record’s microscopic bumps, the wear can change the music over repeated plays.
Minimizing the dirt and crud in the record’s groove each time you play it will maximize the lifespan of the music it contains.
What Products Do I Use?
You will need a small variety of tools and materials. Each one is designed to remove dust and contaminants at different phases of the cleaning process. As the process goes forward, the tools come in closer contact with the record.
If the Colorado River didn’t have any dirt or sand in it, it could not carve the canyon as fast as it has. The dirt and sand turn the water into a sort of liquid sand paper. Using a cleaning tool that touches the record while there is still grit on the vinyl does the same thing. Not good.
Tools and Supplies:
- Can of compressed air. Buy in bulk for less than $4 a can, or $5-9 in twin-packs.
- Carbon fiber brush. $8-25 at a vinyl record store or online.
- Microfiber towel. Dollar store.
- Distilled water. About $1 per gallon at grocery stores. Tap water has minerals in it that will remain on the record and interfere with the sound.
- Liquid detergent
- Isopropyl alcohol
- Spray bottle. Dollar store.
- 100% cotton towels
The water (6 ounces), the detergent (a couple of drops), and potentially the alcohol (2 ounces), will be combined in the spray bottle. There are other mixture ratios recommended by various sources, but go easy on the detergent: you don’t want suds. The alcohol and the vacuum cleaner will be discussed later.
How to Clean
You’ll need a safe surface to lay the record on. It could be as simple as a cotton towel spread out on a table to a spare turntable. A spinning surface like a lazy susan would work well, and some people, who are confident about not getting cleaning liquids in places that could damage it, use their main turntable.
The can of compressed air should be used to blow surface dust off the record before touching it with the other tools. You could blow it off using lung power, but your breath has moisture droplets and germs, neither of which is good for your records. Mould can grow in the groove. Yuck!
After the compressed air, use the carbon fibre brush to follow the path of the groove around the record in a counter-clockwise direction, mimicking the action of the tonearm stylus on the record.
If you have a spinning platform, it is somewhat easier to hold the brush steady on the surface of the record, using little more than the weight of the brush for downward pressure, while spinning the platform in a clockwise motion with the other hand. The non-brush hand can even support the platter to counteract the weight of the brush.
The brush is for removing surface dirt that remained after the compressed air, not to get down into the groove.
Rubbing a vinyl surface tends to create static electricity, much like walking on nylon carpet. Static attracts particles of dirt like a magnet attracts iron. Carbon fibre is anti-static and will serve to reduce the build-up.
After 2-3 revolutions of the brush on the record and cleaning off the brush, it’s time for getting at the dirt down in the groove.
Spray the water mixture 3-4 times evenly spaced around the record. Be careful not to get water on the label, but dab it off immediately if you do. The small amount of detergent in the water acts as a surfactant to reduce the surface tension of the water which allows it to flow into the groove. If the water beads, there is not enough detergent in it. Add 1-2 drops more to the water and spray again. Once the water flows into the groove, it will begin to float the dirt off the record’s surface and hopefully dissolve more stubborn gunk.
Spread the water evenly around the record using the microfiber towel. Keep the record wet, so reapply with the spray bottle if it gets dry. Several reapplications may be necessary if the record is really soiled.
If you buy used records, especially at yard sales or flea markets, you’ll run across some that are significantly dirty.
Here’s where the alcohol comes in. The two purposes it serves are 1,) that it is an additional solvent for lifting other crud, and 2), that it helps the water dry faster. A possible drawback is that some people believe the alcohol will damage the surface of the record. Bottom line, if the record cannot be cleaned adequately without it, use it, but sparingly.
After 2-3 applications of the water mixture, use a dry cotton towel to dry the record, always following the groove in a counter-clockwise direction. Some people suggest running the microfiber cloth, and the carbon fibre brush, in both directions along the groove, but some caution against it.
Drying With A Vacuum
No, it’s not being suggested that after all this you need a special record cleaning machine or vacuum. However, some people have suggested getting a used household vacuum cleaner, putting a row of holes along the length of the crevice tool attachment, and wrapping it in a layer of felt. Plug the end so that when you turn on the vacuum, it will draw air through the felt where the holes are.
Place the modified crevice tool on the record so that it points at the spindle hole. Rotate it or the record so that the water is drawn through the felt into the vacuum to dry the record. This will get more material out of the groove than the cotton towel will.
Clean With Wood Glue
This sounds horrendous since you are adding something to the grooves that will harden on the record, but it has some interesting potential and some folks get good results using this method.
Using a good wood glue, like Titebond III, slowly spin the record while applying a continuous stream of glue in a tight spiral from edge to runout groove, being extremely careful not to get glue on the label. It will ruin the label if you do.
With a piece of card stock or similar semi-rigid straight edge, smooth the spiral of glue so that it forms an even, continuous layer on the record. Supposedly, the glue will reach all the crevices in the groove, seep around all the dirt particles, encasing them in the hardened glue. Do not make the layer too thin anywhere because it might make it difficult to remove. If you can see the groove at all, the glue is too thin.
Let the glue dry for 24 hours. Once dry, carefully peel the dried glue off the record in one complete sheet. That will help get all remnants of glue off the record, hopefully bringing all the dirt off with it.
Not everyone thinks this is a good method. It’s probably not needed anyway.
How Often To Clean Records
Once your record has been thoroughly cleaned using the water solution or glue, it’s time to play or store it. Once it’s on the turntable for playing, there is still a cleaning step that needs to become habit.
Start the turntable spinning, usually by raising the lever that holds the tonearm off the record, but positioning the tonearm over the run-in groove. Lightly hold the carbon fibre brush to the surface of the spinning record, removing the dust that has collected in the moments since cleaning or removing the record from its sleeve. Once finished playing, repeat this light brushing before returning it to the sleeve.
Your goal is always to keep stuff out of the record groove, never play it dirty, and use the least destructive method to clean it. For most of us, perfectly acceptable results can be obtained without glue or a cleaning machine.
- If you enjoyed this article, please “like” us on Facebook too!


